1-877-4-SPRUCE | info@aircraftspruce.com
Aircraft Spruce & Specialty Co.
Aircraft Spruce & Specialty Co.

FREE SHIPPING ON ORDERS OVER $350 (SOME EXCLUSIONS APPLY) | 877-4-SPRUCE


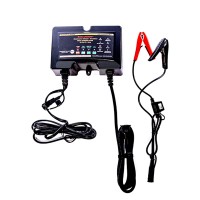
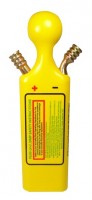
EarthX 12V-24V Jump Pack (All-In-One)
$289.00/Each
Add to cart for current price
Add to cart for current price
Part# 11-18840
MFR Model# ETX-JMP12/24
MFR Model# ETX-JMP12/24
 FREE Shipping
Overview
|
This is a 12V/24V jump pack that can boost just about anything! Very compact and the entire kit is only 4 pounds. This jump pack uses the technology of lithium iron phosphate (LiFePo4) chemistry, not Lithium Cobalt (LiCoO2). LiFePo4 is the most powerful, safest and most robust of all the lithium chemistries, plus double the life span of lithium cobalt packs.
Examples of what it can jump start: automobiles, diesel trucks, motorcycles, boats, construction equipment, experimental and certified aircraft, tractors, snowmobiles, ATV/UTVs, riding lawnmowers, and so much more. Fully charge the unit prior to its first use. Press the power button to check the state of charge (power level). JUMP STARTING
|
WARNING: Cancer and Reproductive Harm - www.P65Warnings.ca.gov. |
Features
- (1) USB 5V/2.1A
- (2) USB-C (15W max output) Will not charge large consumption electronics such as the IPad Pro 11 as this requires 20W)
- High intensity LED flashlight
- Charge level indicator LEDs
- Once charged, will hold it charge level for up to a year
- Short circuit protection
- Built in electronics to protect the battery
- Unique rubber coating on the outside for ease of holding even in bad weather!
- 2 year warranty
Specifications
- Boost Amps: 12V = 800, 24V = 400
- Input: 15V / 2A
- (1) USB 5V / 2.1A
- (2) USB-C Ports
- Capacity: 7.8Ah @ 12.8V (31,000 milliamp-hours for competitor comparison)
- 99 Wh
Documents
- Product Manual (PDF)
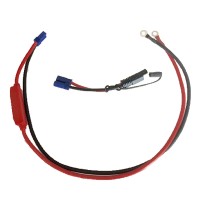
In The Box
- 1 x Power pack (6″x3″x4″) LxWxH
- 1 x 12V adapter
- 1 x 24V adapter
- 1 x Jumper cables
- 1 x Wall charger (100-240VAC 50/60Hz)
- 1 x 12V plug in car charging accessory
- 1 x Carrying case


Q&A
Please note, Aircraft Spruce's personnel are not certified aircraft mechanics and can only provide general support and ideas, which should not be relied upon or implemented in lieu of consulting an A&P or other qualified technician. Aircraft Spruce assumes no responsibility or liability for any issue or problem which may arise from any repair, modification or other work done from this knowledge base. Any product eligibility information provided here is based on general application guides and we recommend always referring to your specific aircraft parts manual, the parts manufacturer or consulting with a qualified mechanic.